Reviewing your Health Facility Microplan
This page is for health facility (HF) staff — for example, the team of a CSB in Madagascar — who review and validate their outreach microplan in GTS.
GTS has prepared a list of localities that your HF should visit during the outreach period. Your job is to check this list with your knowledge of the field, correct it if needed, and validate it before the deadline. You can do everything from a phone, a tablet or a computer. You do not need a GTS account.
Note
Key words used on this page:
Locality — a village or settlement that can receive an outreach visit.
Planned visits — the number of outreach sessions your HF plans during the period (for example, 12). It is set by your programme, and you can adjust it.
Selected visits — the total number of visits in your list. A locality visited twice counts as 2 visits.
You can validate your microplan only when selected visits = planned visits.
Open the microplan page
Open the link sent by your district or national focal point. The same link is used by all HFs.
The Microplan Editing page opens with the list of all health facilities.
The page is displayed in French if your phone or browser is set to French, and in English otherwise. If the
link you received ends with ?lang=fr or ?lang=en, that language is used instead.
If the microplans are being prepared, the message Microplan is being generated, please wait… is shown. Try again later.
Find your health facility
The Microplan Editing page shows the name of the Tracking Round and three figures for all HFs: the number of HFs, the total target population (when a population attribute is configured) and the percentage of microplans already validated (Validation).
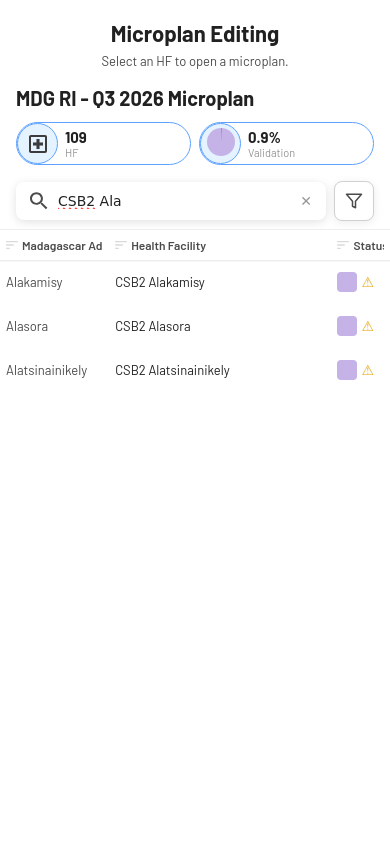
Searching for “CSB2 Ala” in the list of the 109 HFs of the MDG demo
To find your HF:
Type at least 3 letters of its name (or of its area) in the Search… box, for example
CSB2 Ala. The list updates after a short pause.Or tap the filter button (funnel icon, Filter by area), choose your district or commune, then tap Apply. Each area shows the percentage of validated microplans.
Tap your HF in the list to open its microplan.
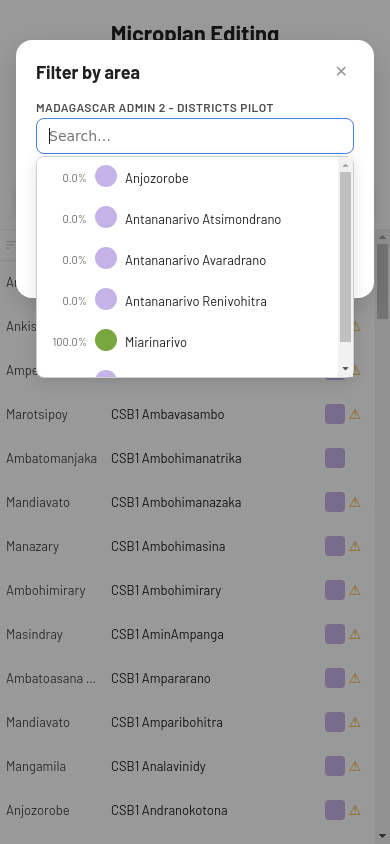
Filter by area: each area shows the share of validated microplans
You can sort the list by tapping a column title (area, Health Facility, population, Status).
In the Status column, a coloured square shows whether the microplan is validated: green when validated, light purple when not yet. Tap it to see the date of the last change. A ⚠ sign means that the number of selected visits does not match the number of planned visits; tap it to read Not enough visits selected or Too much visits selected.
Export CSV downloads the HF list with the status and the date of the last update of each HF. Focal points can use it to follow up with late HFs.
Tip
Once your microplan is open, add the page to your bookmarks (favorites). The saved address opens your microplan directly, without searching the list again.
Understand your microplan
At the top of your microplan you find:
the back arrow, to return to the HF list;
the areas your HF belongs to, and the name of your HF;
the status: In progress (purple), Validated (green) or Closed (grey), with the date of the last change (Last update) or of the validation (Validated at);
summary figures: Visitation (planned visits), the number of areas covered (for example, Fokontany), the target population of your selected localities compared with all localities of your area, and the period of the outreach activity.
Below, two views show the same information:
List View — the localities as a list, grouped by area;
Map View — the localities on a map around your HF.
Tap List View or Map View to switch. If you turn your phone sideways, or use a computer screen, both views are shown side by side.
List view
The counter at the top of the list shows selected visits | planned visits. If the two numbers are different, the first number is shown as a warning and the message Total number of localities must match the number of planned visits appears.
The list has two tabs:
Selected — the localities in your microplan, numbered. These numbers are also used on the map and in the PDF.
Unselected / Excluded — other localities of your area that are not attributed to any HF: localities waiting for a decision, excluded localities (with their reason), and localities marked too close to an HF.
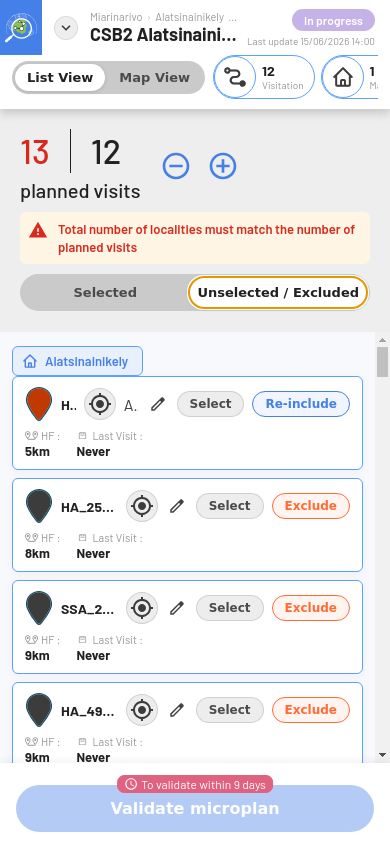
Unselected / Excluded tab of CSB2 Alatsinainikely: an excluded locality with its reason, and localities waiting for a decision
Each locality card shows:
the distance from the HF (HF :);
the target population, when configured (for example, estimated population);
the date of the last visit (Last Visit :), or Never;
for selected localities, the number of visits (Visits:).
Tap the target icon on a card (Show on map) to show the locality on the map.
Map view
The map shows your HF, the localities of your area and a blue circle around the HF. The circle shows the minimum distance for outreach (for example, 5 km): localities inside it are expected to come to the HF rather than receive an outreach visit. A grey dashed line shows the limit of your area. When GTS has computed a road route from your HF to a selected locality, the route is drawn as a blue line.
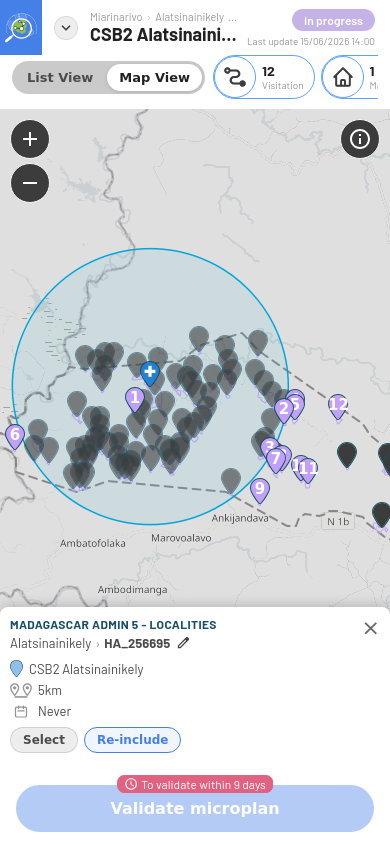
Map view of CSB2 Alatsinainikely: 5 km circle, numbered selected localities, and the details of an excluded locality (Select or Re-include)
Tap the i button at the top right of the map to open the Legend:
Health Facility — your HF;
Selected — localities in your microplan (purple pin with the locality number);
Already visited — localities visited during the previous period (green pin);
Waiting — localities not selected yet (dark pin);
Too close to HF — localities inside the minimum distance (faded dark pin);
Excluded — localities you excluded, with a reason;
In another microplan — localities selected by another HF of your area (lock icon). You cannot change them.
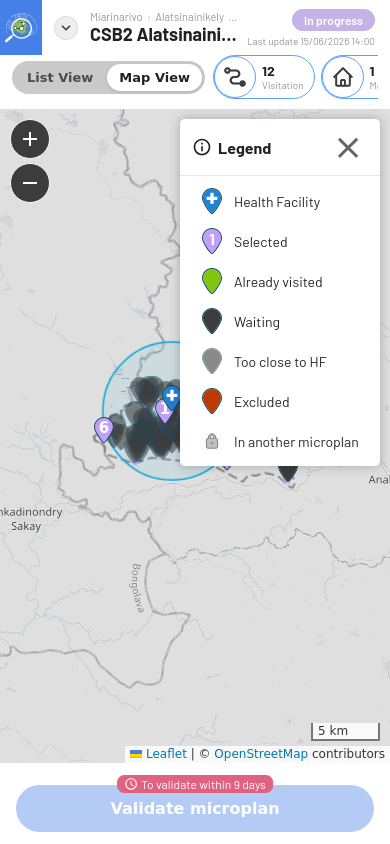
Map legend
Tap a pin to open its details at the bottom of the screen (see the map view above): layer, area and locality name, HF, distance (in red when the locality is too close), population, last visit (when visit history is used), and the available actions: Select and Exclude (or Re-include) for a locality that is not selected, − and + for a selected one.
Adjust your microplan
You can make the following changes from the list or from the map. Each change is saved immediately.
Add a locality
Open the Unselected / Excluded tab, or tap a dark pin on the map.
Tap Select.
The locality moves to the Selected tab with 1 visit.
Localities marked too close (faded pin) are listed at the end of each group. GTS did not propose them because they are inside the minimum distance from an HF. Select them only if the population cannot reach the HF.
Change the number of visits of a locality
Some localities need more than one outreach session, for example a large village or a village where several vaccination contacts are needed during the period.
Find the locality in the Selected tab, or tap its purple pin on the map.
Tap + to add a visit, or − to remove one.
The counter at the top updates the number of selected visits.
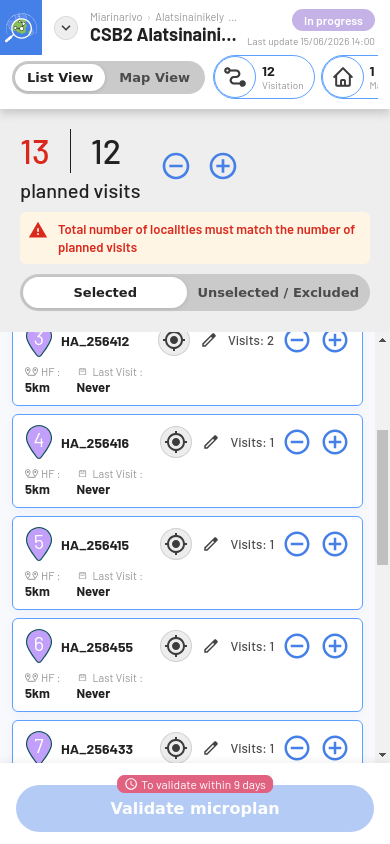
A selected locality increased to two visits
Remove a locality from your microplan
In the Selected tab (or on the map), tap − until the number of visits reaches 0.
The locality moves to the Unselected / Excluded tab.
The locality is now waiting. If you know it should not be visited, exclude it with a reason, as described below.
Exclude a locality and give a reason
Giving a reason helps your district understand your choices.
In the Unselected / Excluded tab (or on the map), tap Exclude for the locality.
In the Remove a locality window, choose one option:
Not planned for this microplan — the locality is simply not visited in this microplan;
or one of the reasons under Or exclude this locality: Access constraints (security / seasonal obstacles), Uninhabited locality, Assigned to another health facility, Temporary closure or site inaccessibility, Population moved to health facility (despite a distance > 5 km), Population below operational threshold, Duplicate or merged locality, Data quality issue (coordinates / boundaries), or Other.
Tap Confirm, or Cancel to keep the locality waiting.
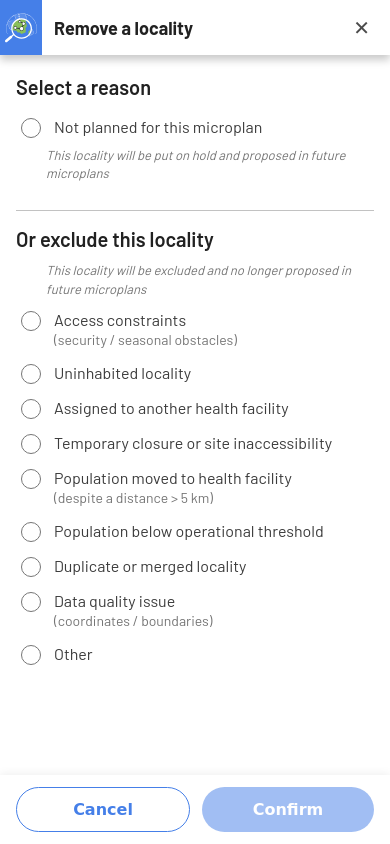
Remove a locality window
The reason is shown on the card and the pin becomes the Excluded pin. To undo, tap Re-include, or Select to add the locality to your microplan directly.
Note
The window explains that a Not planned locality may be proposed again in later microplans, and that an excluded one will not. In the current version, GTS records the reason so that your district can see it, but new microplans do not yet take earlier reasons into account.
Rename a locality
If a locality name is wrong, tap the pencil icon, type the correct name and tap Save. The new name is saved in GTS and used everywhere this locality is shown, including the maps of other activities that use the same locality layer. Rename only to correct a real error.
Change the number of planned visits
If your HF can do more or fewer outreach sessions than planned, use − and + next to the counter at the top of the list. Agree on this with your district first: it changes the objective of your HF.
Example from the MDG demo: CSB2 Alatsinainikely has 12 planned visits. Its team added one locality, excluded another one, and gave a third locality two visits. The counter shows 13 | 12 (13 in red) and Validate microplan is disabled. To validate, the team either removes one visit or, if agreed with the district, increases the planned visits to 13.
Validate your microplan
When the number of selected visits equals the number of planned visits:
Tap Validate microplan at the bottom of the page. The button is disabled while the numbers are different. The badge above it shows how many days are left (To validate within N days).
The Microplan validated window opens. Tap Export to download the PDF of your microplan, or Open another microplan to return to the HF list.
After validation, the status is Validated (with Validated at and the date) and the microplan is read-only. The Export button replaces Validate microplan: choose PDF or XLSX to download your microplan (see Validated Microplans and Exports).
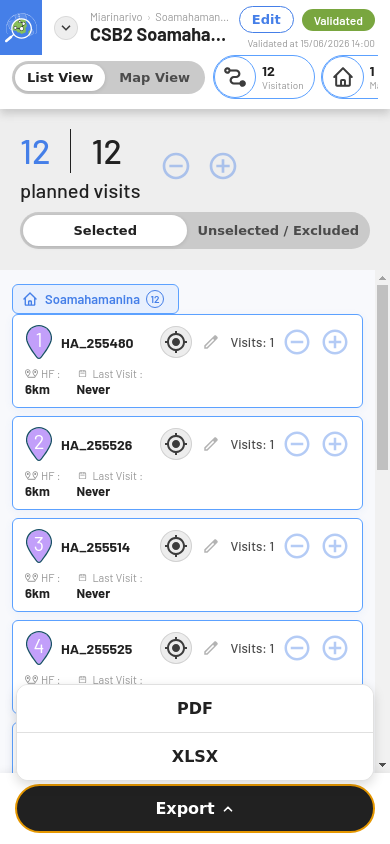
CSB2 Soamahamanina, validated with 12 visits out of 12: Edit button and Export menu
Change a validated microplan
Until the deadline, you can still change a validated microplan:
Tap Edit next to the status.
In the Return to edit mode? window, tap Edit microplan.
The microplan is no longer considered validated. Make your changes, then tap Validate microplan again.
After the deadline
Moderation closes at the start of the deadline day: validate before that day. The badge To validate within N days counts down to this moment.
From the deadline day, or once your focal point has applied the microplans, the status shows Closed. Validation is no longer possible and the Export button replaces Validate microplan (after the deadline, the Edit button also disappears). Do not make further changes: they may not be taken into account. Microplans that were not validated may still be used by your programme, depending on its settings (see Auto Microplanning (Administrators)).
Contact your district focal point if you could not validate in time.