Tracking Round Level
The Tracking Round level permits editing of details and configuration of tracking rounds. Organization Focal Points and Field Activity Focal Points can edit tracking round details.
To access the Tracking Round level of the administration console in the GTS Dashboard; click on the tracking round name from within the Tracking Round tab at the Field Activity level:
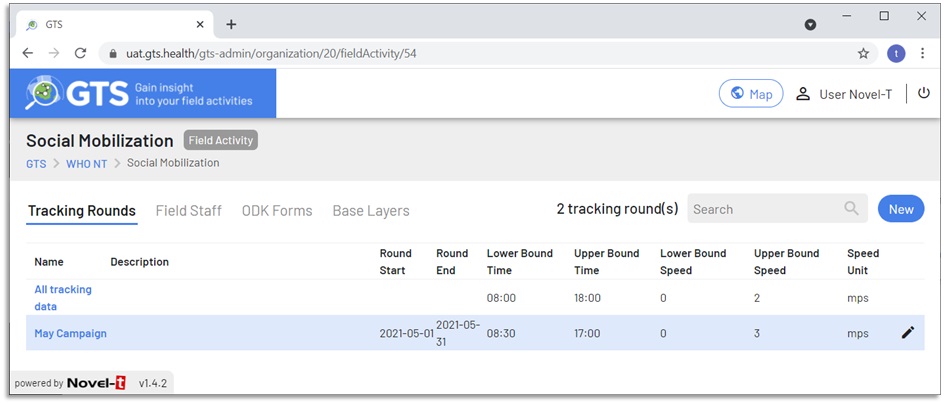
GTS Dashboard access to the Tracking Round level
The Tracking Round level offers eight tabs “Base Layers”, “Targeted Areas”, “Geocoverage Dashboard”, “Field Staff”, “Team Codes”, “Logistic Support”, “Device Monitoring” and “Teams Deployment”:
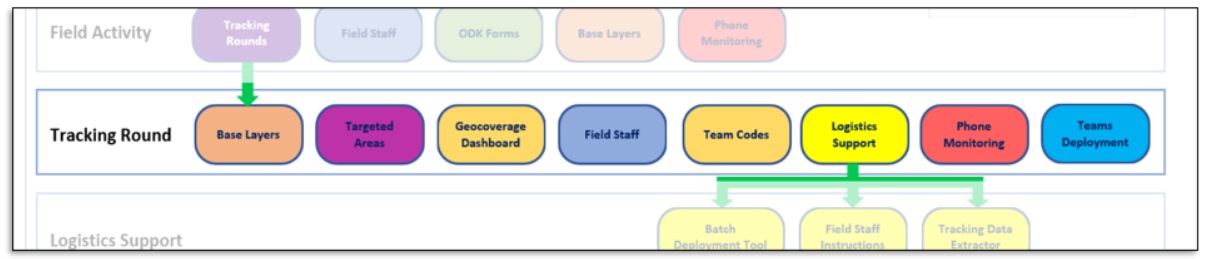
GTS Dashboard available tabs at the Tracking Round level
1. Base Layers Tab
Base layers are nested shapefiles used for aggregation and geographic investigation. Typically base layers represent administrative boundary levels (level 0 country, level 1 first sub-division etc.); however, base layers may include any shapefiles that respond to field activity analysis needs such as health zones, watersheds, and the like. Base Layers may be uploaded at the Organization, Field Activity and Tracking Round levels, the level at which a base layer is uploaded determines its availability (base layers loaded at the Field Activity level will only be available for the field activity at which they were uploaded).
Although base layers may be uploaded at different levels, they may only be selected at the Tracking Round level when uploading the Targeted Areas file.
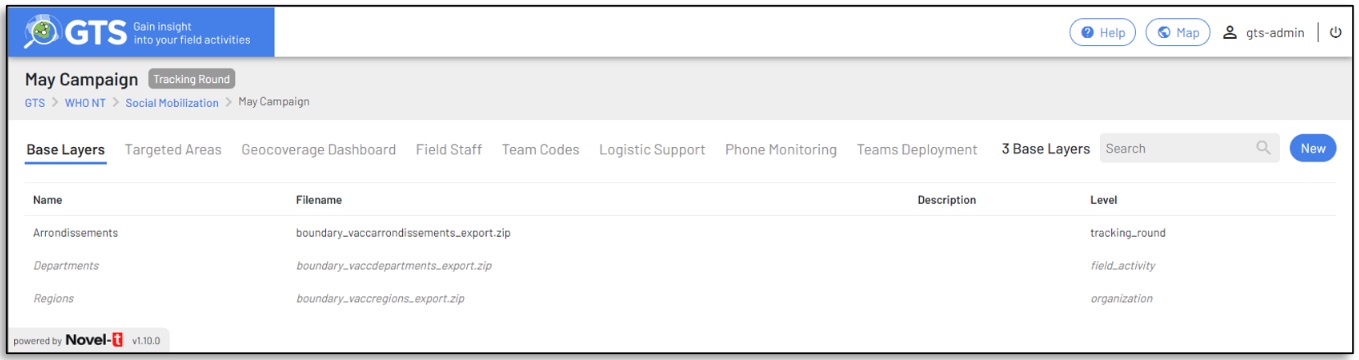
Base Layer tab at the Tracking Round level
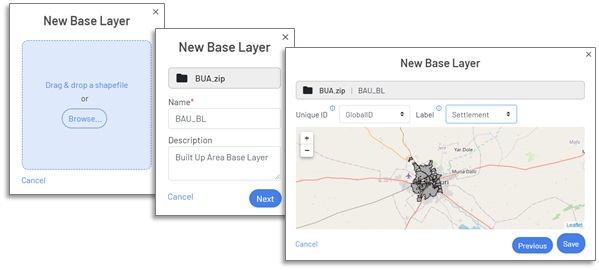
To add a base layer that would only be available at the current Tracking Round level click on the “New” button to display the New Base Layer form that provokes the base layer upload wizard.
Drag and drop or browse to the .zip file that contains the ESRI shapefile components of the base layer, provide the base layer with a name and description and identify the unique ID and label to be used for time trend analysis and map display and search functions. Click the “Save” button and the Base Layer will be saved and attributed to the Tracking Round.
Adding a base layer at the Tracking Round level
To edit or delete a Base Layer at the Tracking Round level, click on the pencil icon to the right of the Base Layer record to display the forms that permit changing a Base Layer’s name or description, unique ID and label; to change the underlying shapefile the base layer would need to be deleted and recreated.
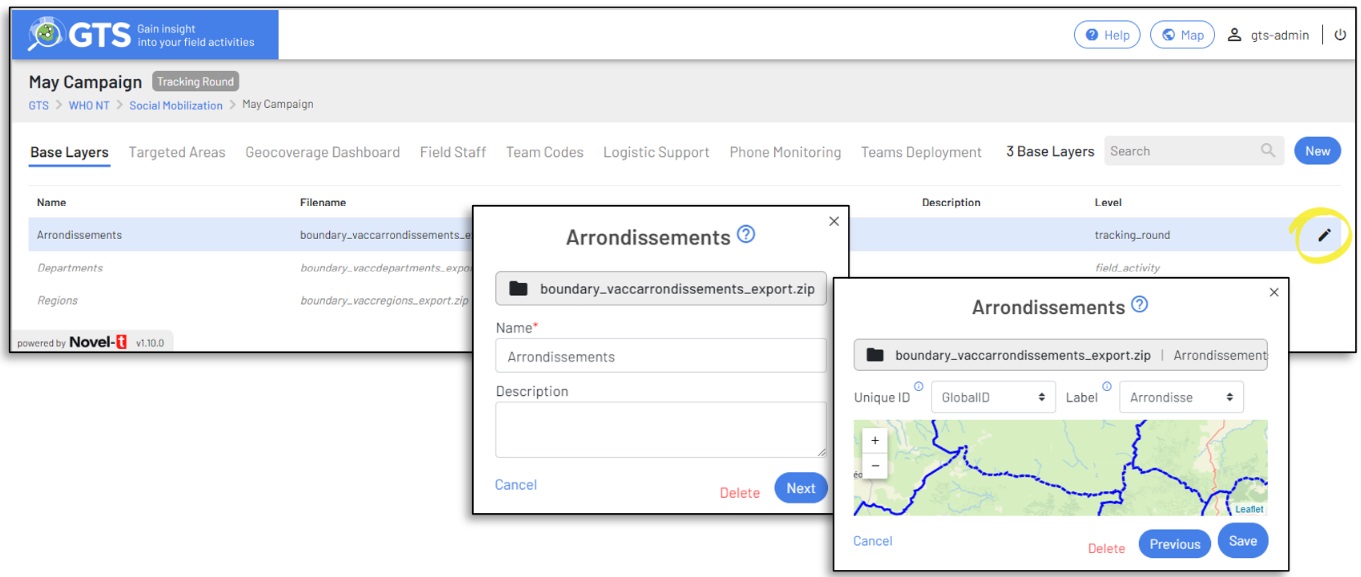
Editing a base layer at the Tracking Round level
2. Targeted Areas Tab
Targeted Areas are polygons that define the geospatial goals of the Tracking Round, areas where the round aims to cover. Whereas many base layers may be defined for aggregation purposes, a Tracking Round will only have one set of Targeted Areas. Targeted Areas polygons must be in the form of a .zip archive containing the ESRI shapefile components of the dataset containing the Targeted Areas polygons. To upload a new Targeted Areas shapefile:
Adding a new Targeted Areas shapefile at the Tracking Round level
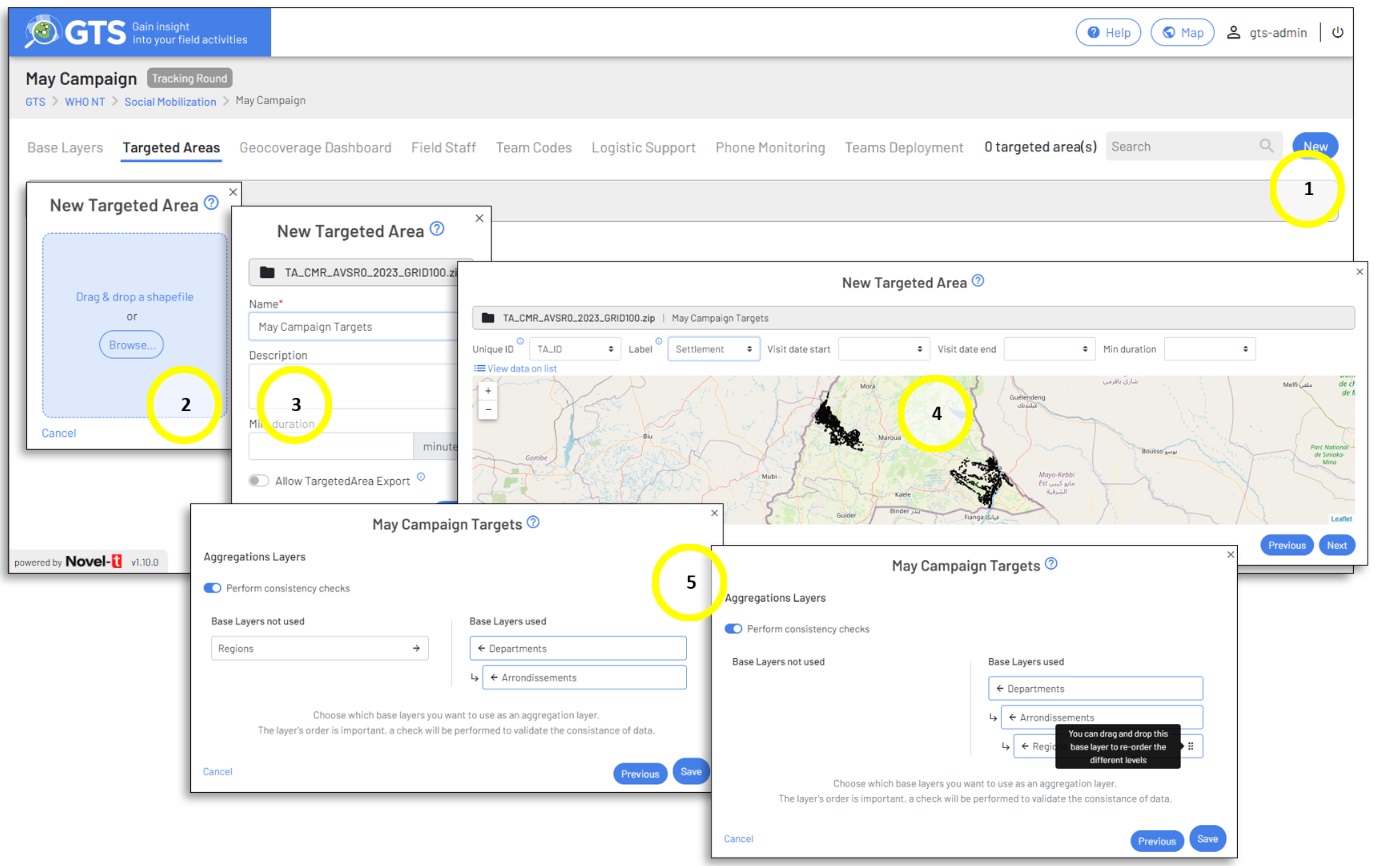
Click on the “New” button to start the New Targeted Areas wizard
Drag and drop or browse to the location of the .zip archive that contains the shapefile components
Provide a Name and optional Description for the Targeted Area dataset. Other optional configuration items common to all targeted areas are
The minimum duration field staff must spend in a targeted area for it to be considered as visited
Whether to include Targeted Areas by default in MS Excel downloads from the map display
Attributes unique to each targeted area must be part of the shapefile attribute table
Unique ID: Of the record in the dataset, this will be required to perform time trend analysis
Label: To display the area name on the map and to search areas by name
Visit date start: The scheduled start date of visits to an individual targeted area to determine the validity of a visit
Visit date end: The scheduled start date of visits to an individual targeted area to determine the validity of a visit
Minimum duration: The minimum amount of time that a visit must last for it to be considered valid
Selecting the base layers to use for aggregation when analysing targeted areas coverage
Base layers must be sorted with the largest on top of those with polygons nested within it
Once a Targeted Areas shapefile has been uploaded it may be edited or deleted by clicking on the “Edit” button to open the Targeted Areas wizard forms.
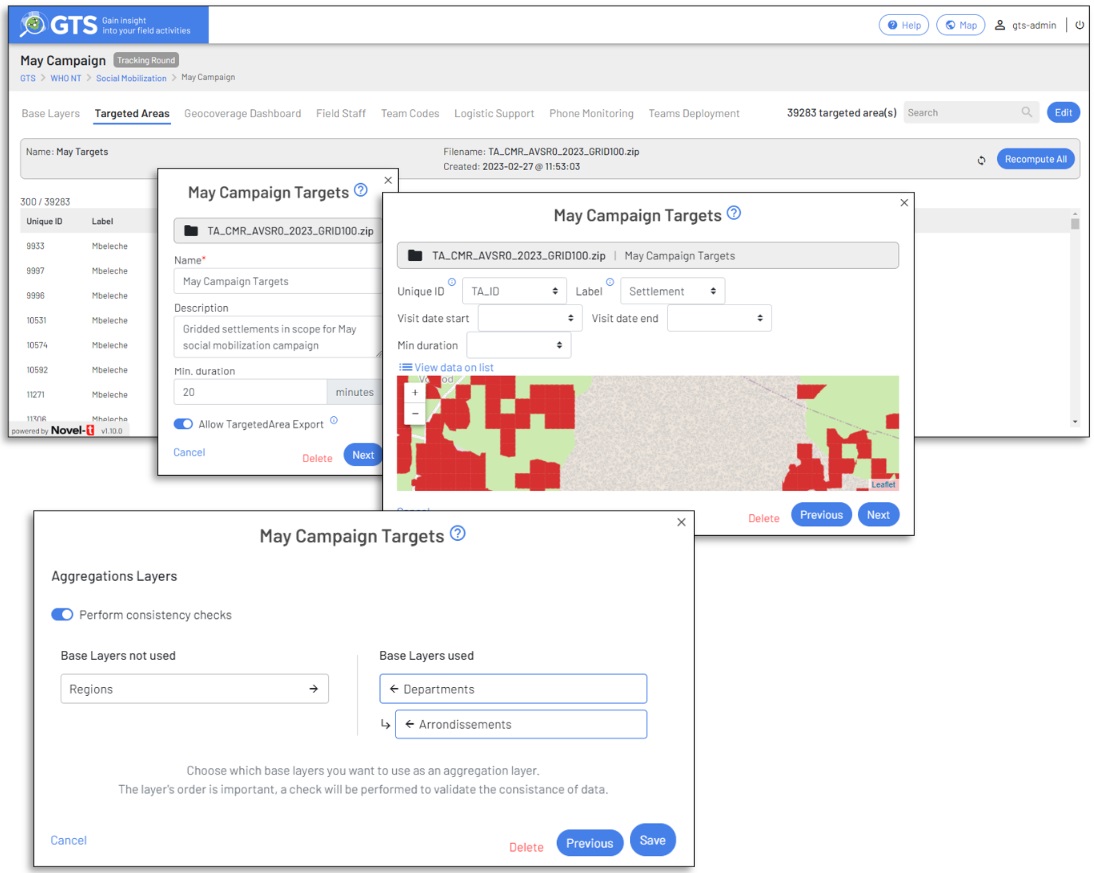
Editing and deleting Targeted Areas
Note
Although all the GTS attributes of an uploaded targeted areas shapefile may be edited, the shapefile itself cannot be edited from within GTS. To change the shapefile the targeted areas entry must be deleted and a new amended shapefile uploaded in .zip format
Note
In order to add new base layers to a targeted area, the base layers must first be uploaded in a base layers tab at the organizational, field activity or tracking round levels and then selected in the base layer tab at the tracking round level.
3. Geocoverage Dashboard Tab
Once the Targeted Areas and BaseLayers have been uploaded, bespoke analysis for the tracking round may be configured in the Geocoverage Dashboard tab. The GTS can incorporate a wide array of quantitative and qualitative attribute values from the targeted areas shapefile and/or associated ODK forms into this analysis.
Qualitative Attributes
Qualitative attributes describe the targeted areas and are used for grouping targeted areas in the analysis. The example below groups targeted areas by settlement type: Built-Up Areas (BAU), Hamlet Areas (HA) and Small Settlement Areas (SSA):
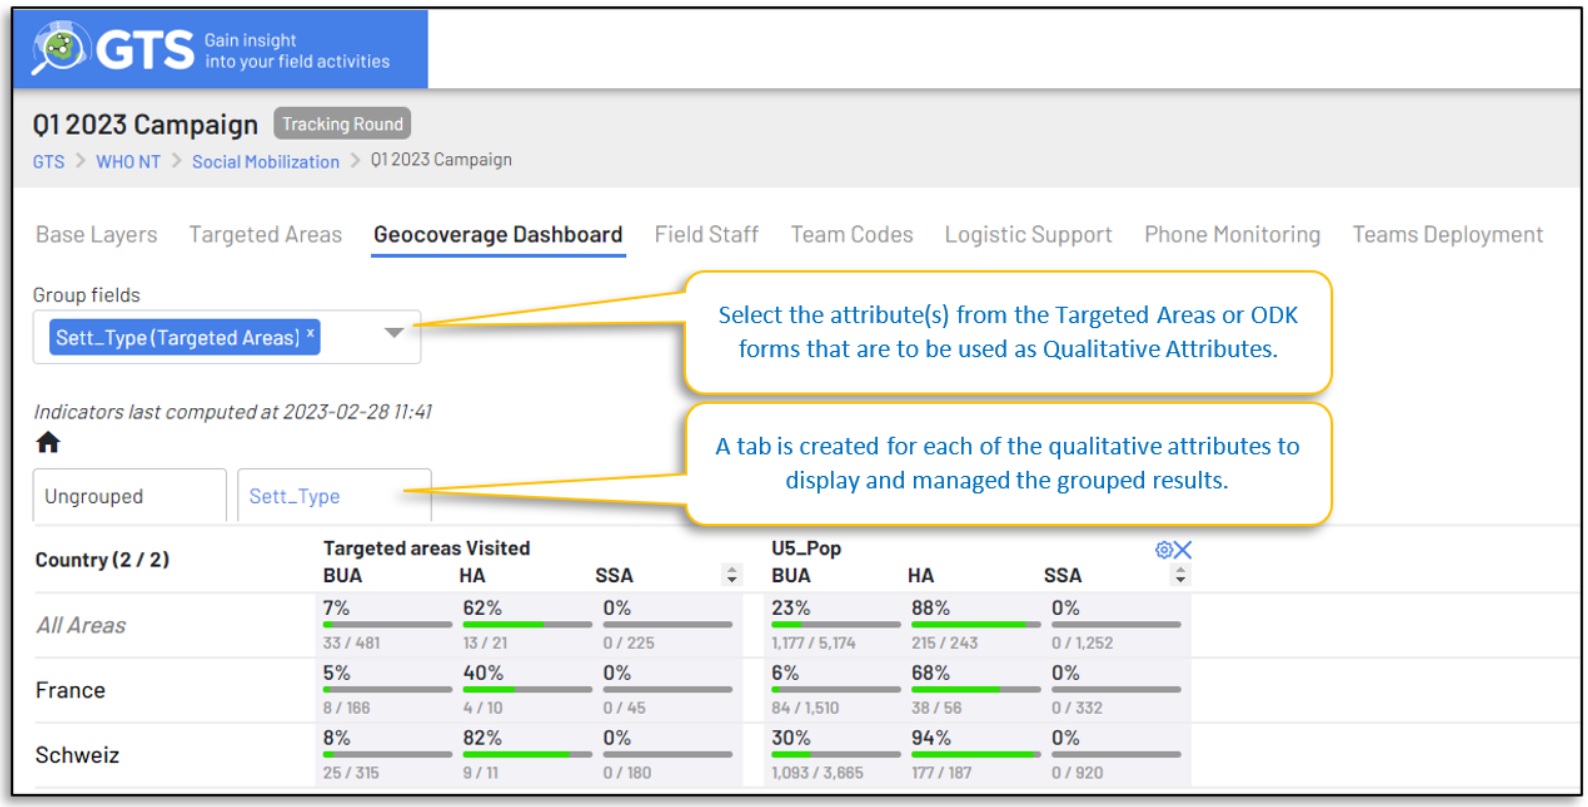
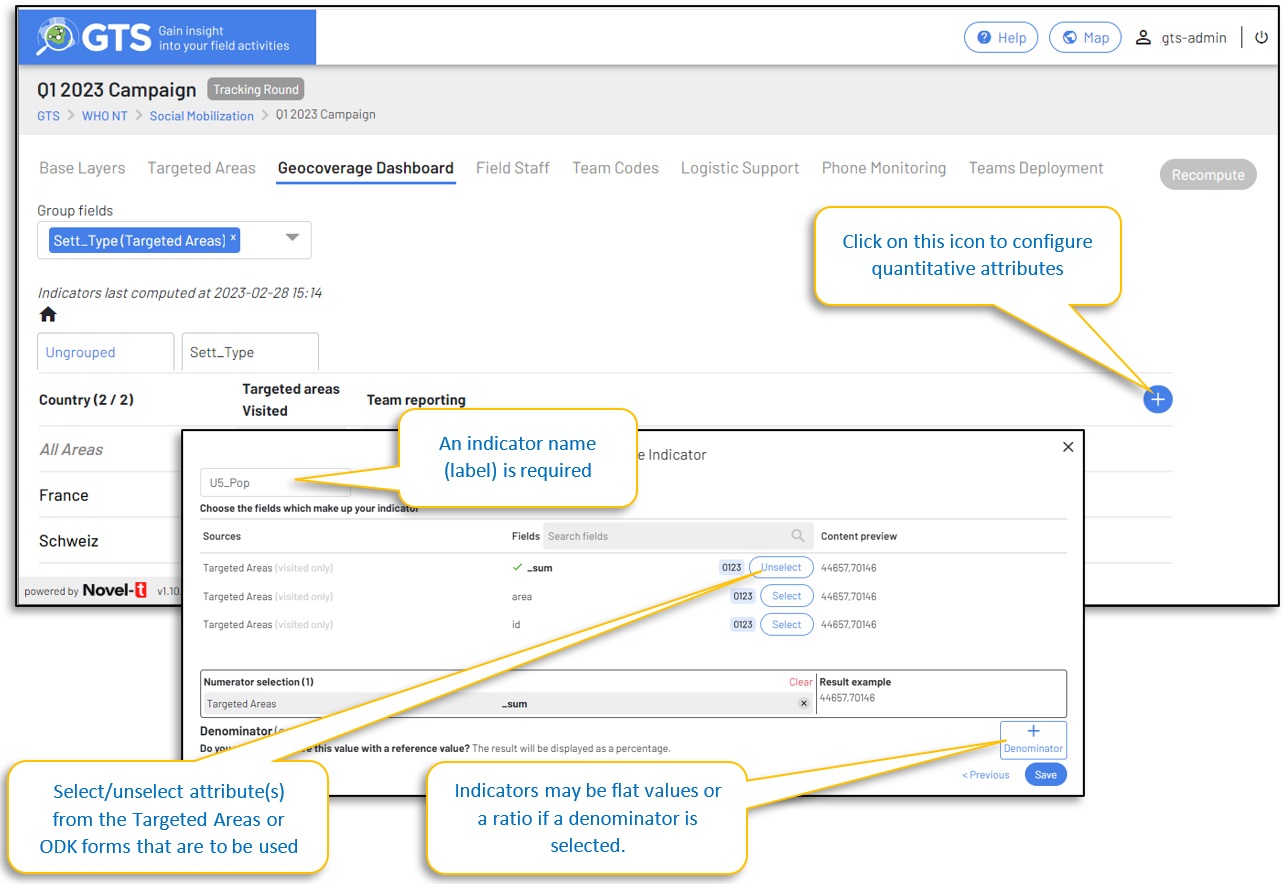
Quantitative Attributes
Quantitative attributes are summed across aggregation levels, in the example below the estimated population of children under 5 years old (U5_Pop) is used to describe the targeted areas.
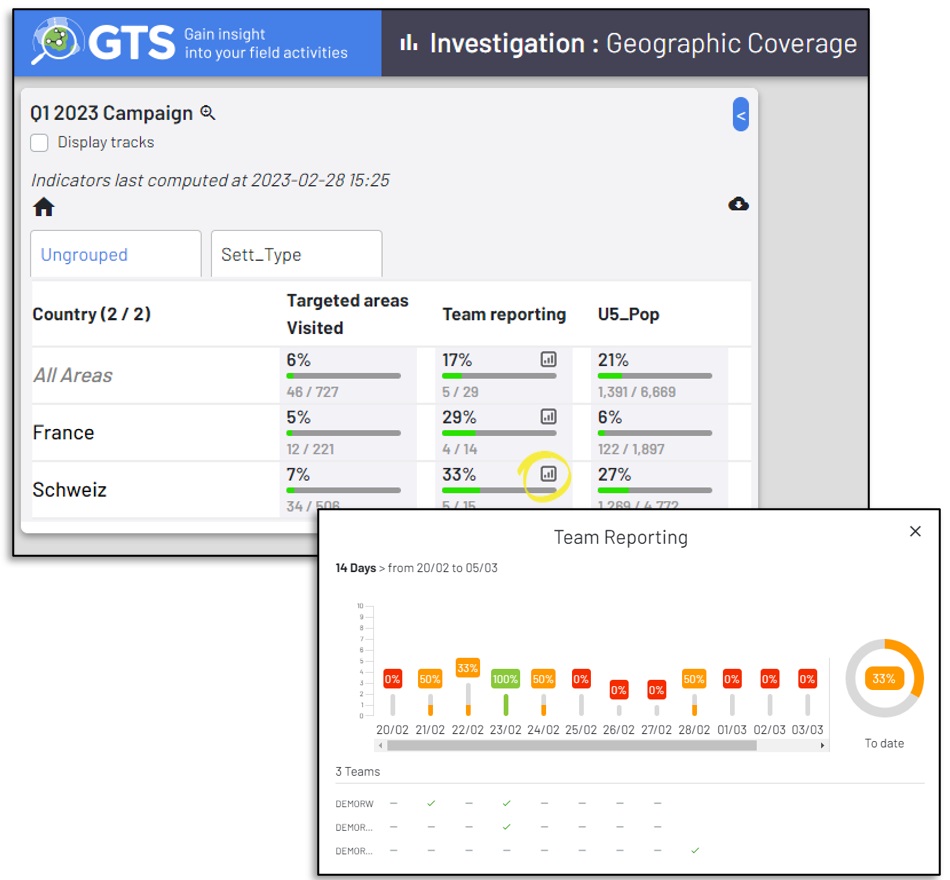
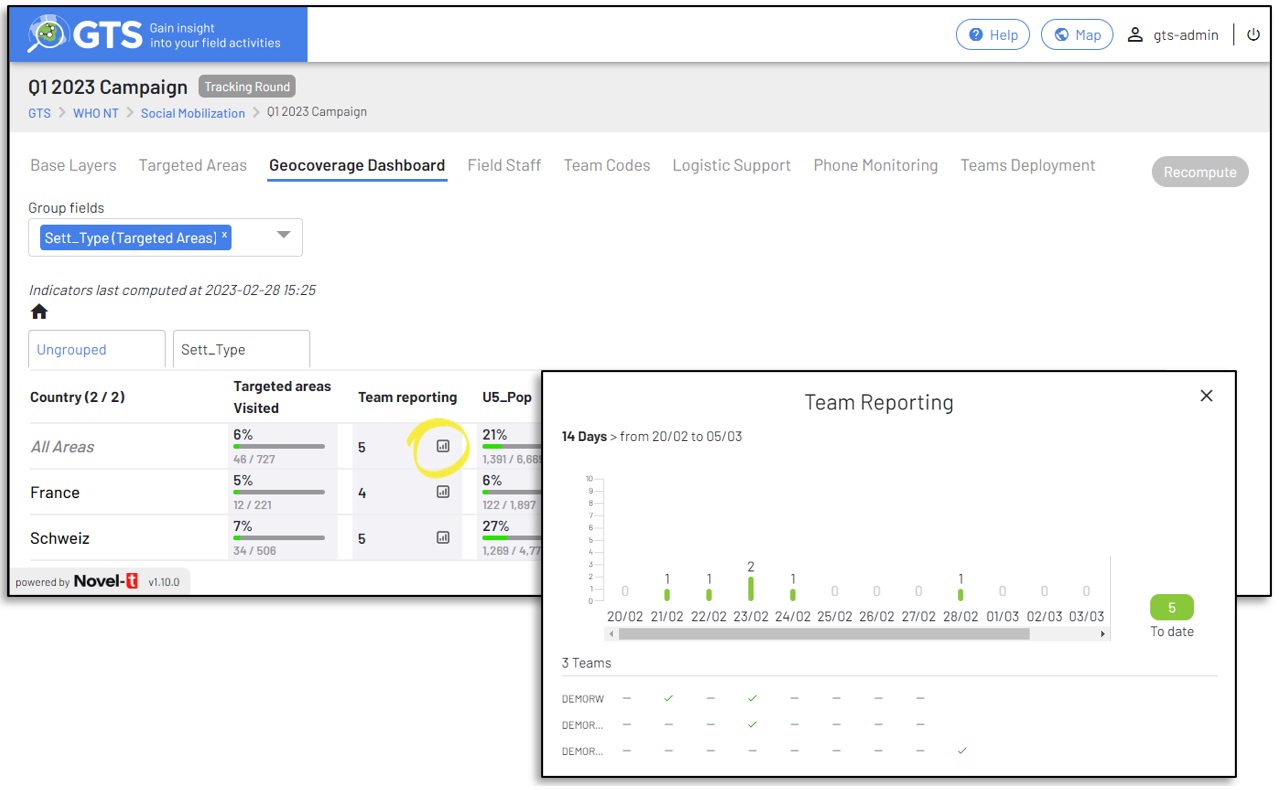
Team Reporting
If team codes are used an analysis column for “Team Reporting” will appear, click on the icon to preview the Team Reporting pop-up display that will be available in the Geo-Coverage Investigation of the map display frontend.
4. Field Staff Tab
The Field Staff tab at the tracking round level displays a list of the field staff assigned to the tracking round and allows for the assignment of field staff listed in the Organization Field Staff tab, it does not permit adding, importing nor editing of field staff as is the case at the higher levels Field Activity and Organization. Click on the “Manage” button to add or remove, from the tracking round, field staff that are assigned at the field activity level.
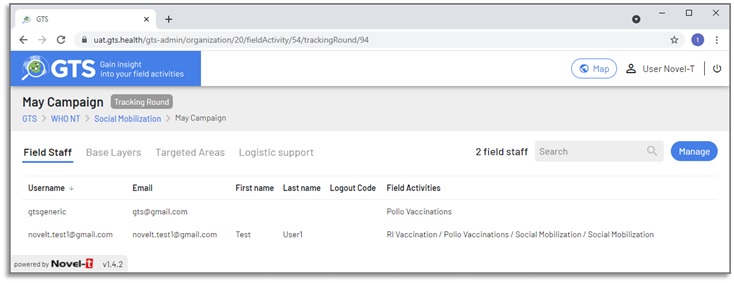
GTS Dashboard Field Staff tab at the Tracking Round level
Clicking on the “Manage” button will display a form from which the Field Staff available to the Organization may be selected, click “Select All” once to select all available field staff and twice to deselect all available field staff. Click save to update the Tracking Round to filter tracks based on the selected Field Staff and update the list that appears in the tab.
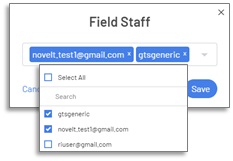
Field Staff selection form
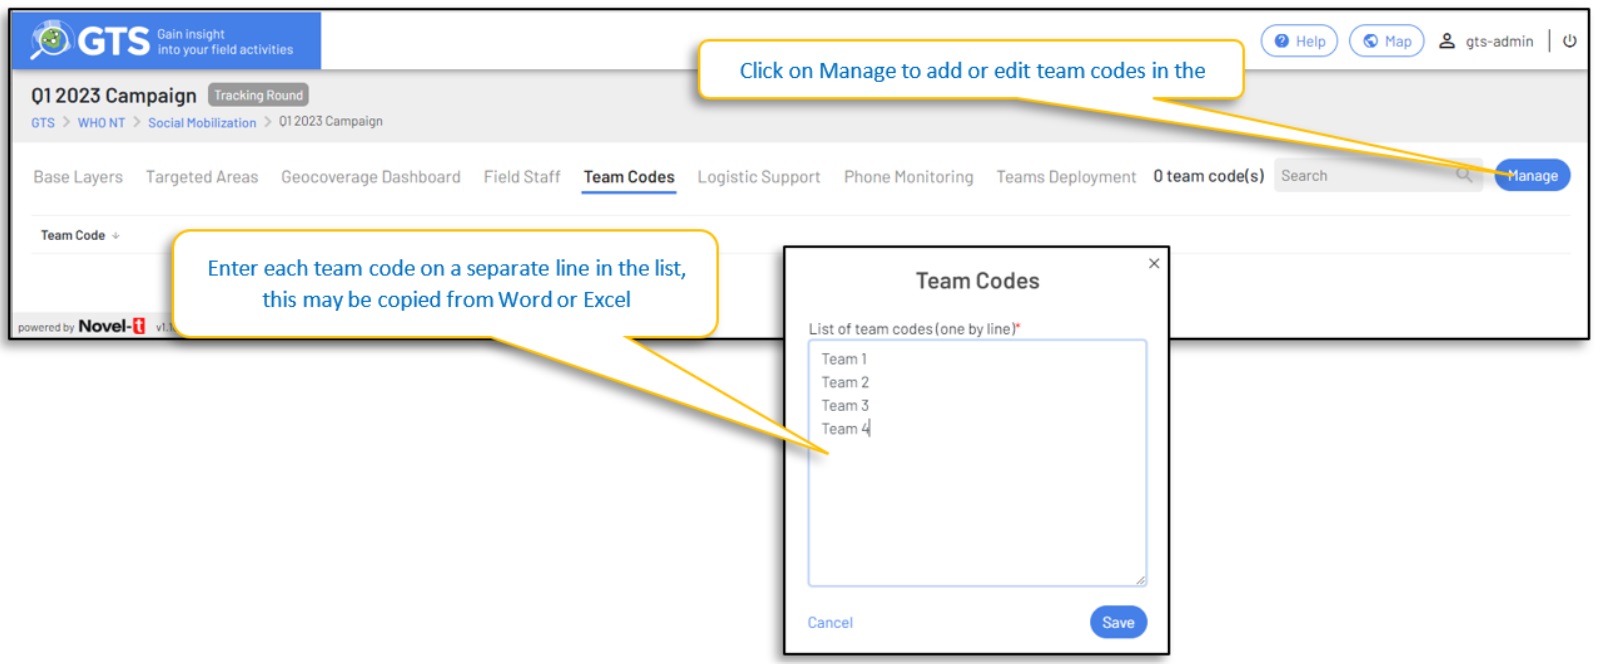
5. Team Codes Tab
When Team Codes are configured to ‘prompt’ or ‘required’ in the field activity configuration, the team codes tab will appear. This enables the creation of a list of acceptable team codes that field staff may select from the mobile app. If no list is provided team codes will be in a free text format.
Hint
Leaving Team Codes as free text is discouraged as this may lead to misleading data due to spelling variations and errors.
6. Logistics Support Tab
The Logistics Support tab provides access to the tools that enable deployment of the GTS Mobile application and the Tracking Data Extractor.
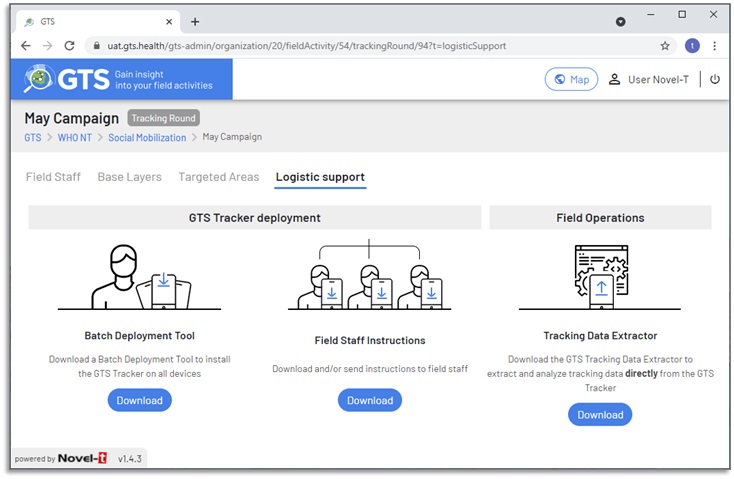
Logistics Support Tools
Batch Deployment Tool
The Batch deployment tool is downloaded locally and enables the automated installation of the GTS Mobile application to Android mobile devices using a USB connection. Batch deployment is only available for field staff logins that are not nominative (generic). The tool installs the GTS Mobile app to automatically start logged in as the generic account and recording tracks for the field activity under which it is downloaded.
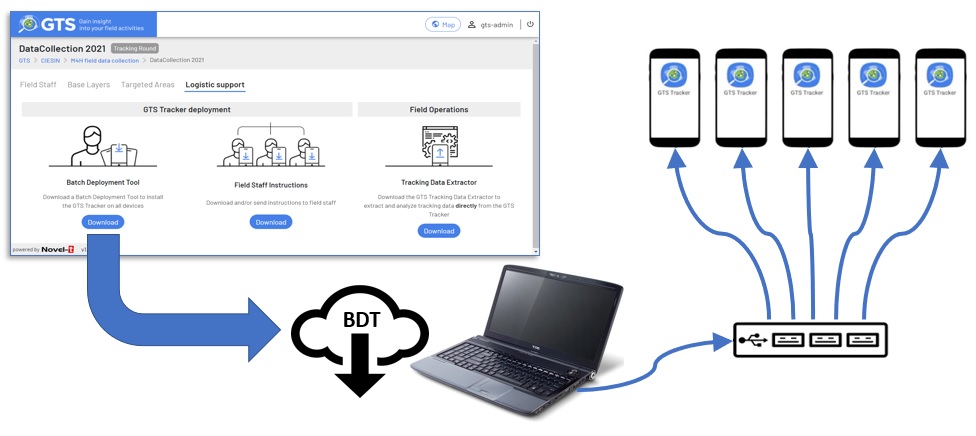
Batch Deployment Tool Overview
Click on the Batch Deployment Tool “Download” button and select the field staff account to get a local copy of the tool
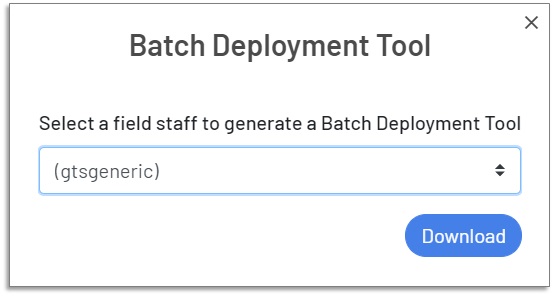
Batch Deployment Tool Download
The .zip archive ‘gts_batch_deployment_tool.zip’ will be downloaded locally when unzipped it will provide a README.pdf
file, a User Guide.pdf, and the tool itself among other files.
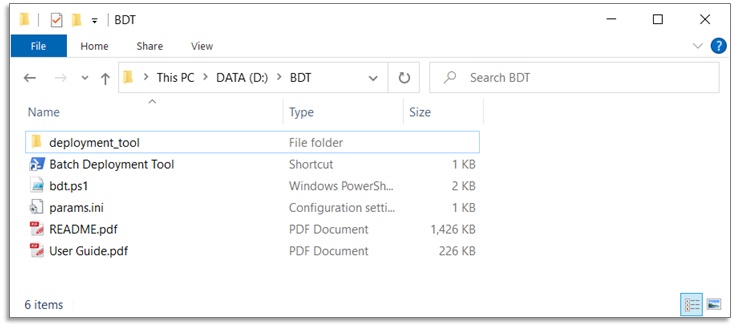
Batch Deployment Tool artefacts
To launch the batch deployment tool follow the instructions in the README.pdf file
The README.pdf file explains:
How to configure Android devices to receive a batch deployment, USB debugging is required
How to run the Batch Deployment Tool from the local computer
How to initiate Android phones once the GTS Mobile application has been downloaded
Note
With the Batch Deployment Tool, it is possible to install the GTS Mobile application to several Android devices simultaneously by using a USB hub.
The User Guide file is a one-page brief instruction for users, this guide also includes a QR code that can be used to log in to the GTS application.
Field Staff Instructions
The field staff instructions tool is used to generate a user-specific two-page GTS Mobile application installation guide for
field staff which may be saved locally in .pdf format e-mailed directly to the field staff (provided an e-mail address is associated with the field staff
login) or both.
Click on the Field Staff Instructions “Download” button and check which field staff are to receive an e-mail directly, a .pdf downloaded locally or both or neither.
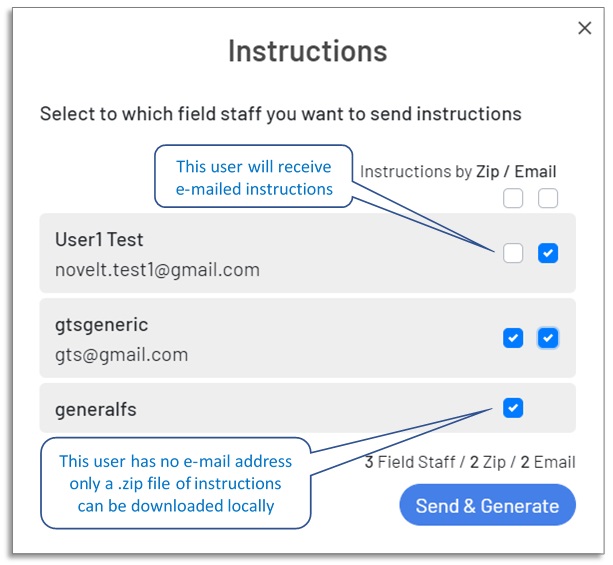
User Instructions for GTS Mobile application installation
Note
Field Staff must be assigned to the tracking round using the “Manage” button in the Field Staff tab to appear in the Instructions list.
Tracking Data Extractor
The Tracking Data Extractor provides for local downloads of data (tracks and ODK data) from Android devices via a USB connection prior to uploading to the GTS dashboard. The tracking data extractor creates a local copy of the data, no data is removed from Android devices by the data extractor. Uploading to the GTS Dashboard via the Internet, however; will remove all data from the Android devices once a successful upload is confirmed. Use of the tracking data extractor must precede uploading to the GTS Dashboard.
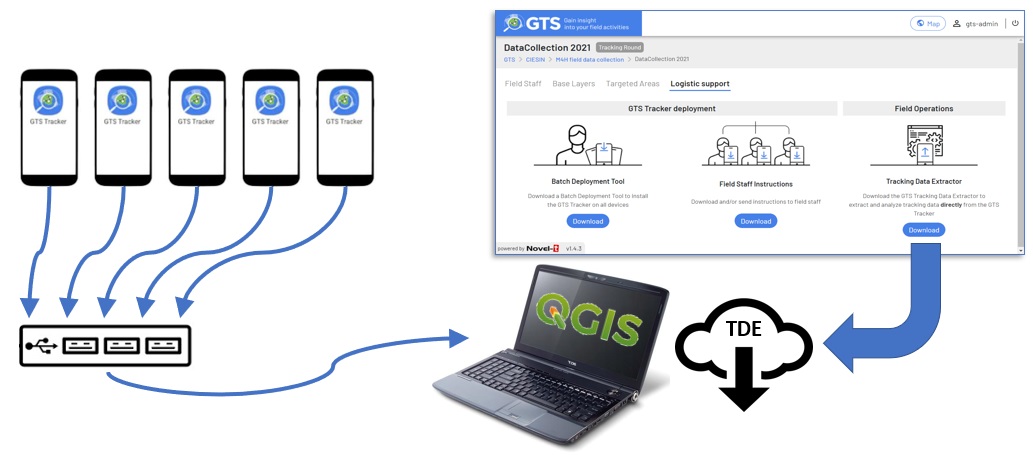
Tracking Data Extractor Overview
Click on the Tracking Data Extractor “Download” button to obtain a local copy of the tool (currently the data extractor is only available for MS Windows) in a .zip achieve
gts_tracking_data_extractor.zip. Unzipping the archive will produce a readme.pdf file, the GTS Tracking Data Extractor shortcut and the gts_tde
folder containing the tool and its components.

Tracking Data Extractor artefacts
The readme.pdf file describes:
How to configure Android devices for use with the Tracking Data Extractor (USB debugging is required)
How to launch the tool and start a new project
How to connect one or several Android devices and Export GTS data to the local drive
Where to find tracking and ODK data on the local drive
7. Device Monitoring Tab
The Tracking Round Device Monitoring tab (previously Phone Monitoring) assists in the administration and analysis of Android devices uploading tracks for the tracking round. It describes the state of the GTS mobile application when the device last uploaded tracks providing details as described in the table below:
Data field name |
description |
|---|---|
DeviceID (previously IMEI) |
The unique identifier of the android device (International Mobile Equipment Identity) or NT· S/N. |
Device Version (previously APK Version) |
Version of the GTS Mobile Tracker installed on the device. |
Avg Track / track session |
The average number of tracks included in an upload. |
Doze mode issues |
A check if the device is properly configured for battery optimization. |
Suspicious Tracks |
A check if tracks uploaded display anomalies that should be investigated. |
GPS accuracy |
The reported accuracy of the last GPS signal in meters. |
Last Upload date |
Date at which the server last received tracks from the device. |
Last used by user |
The login that last uploaded tracks from the device. |
Last used by team |
The Team code that last uploaded tracks from the device. |
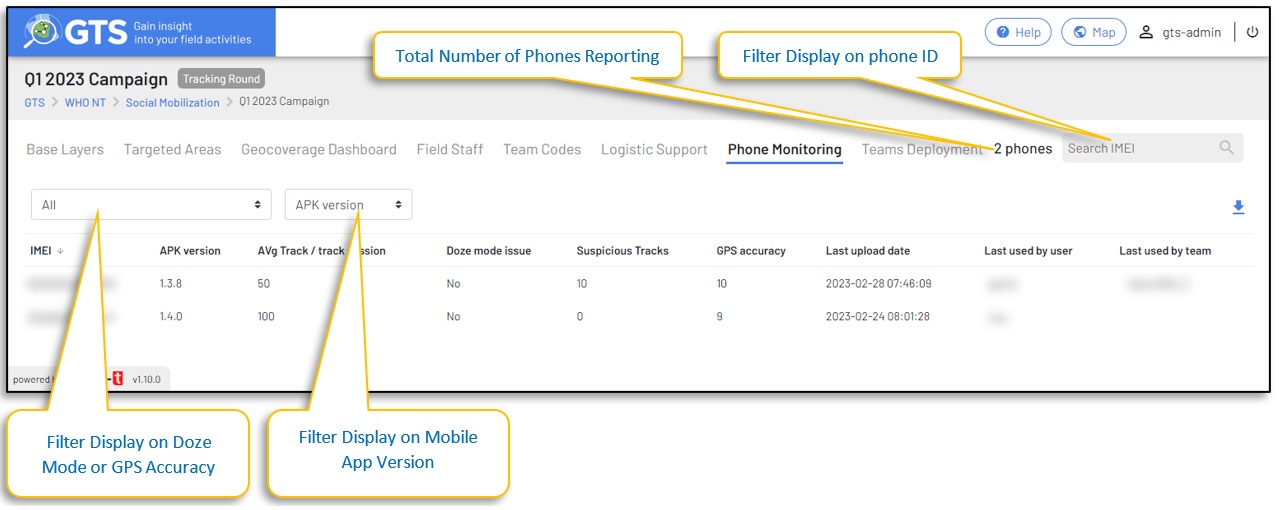
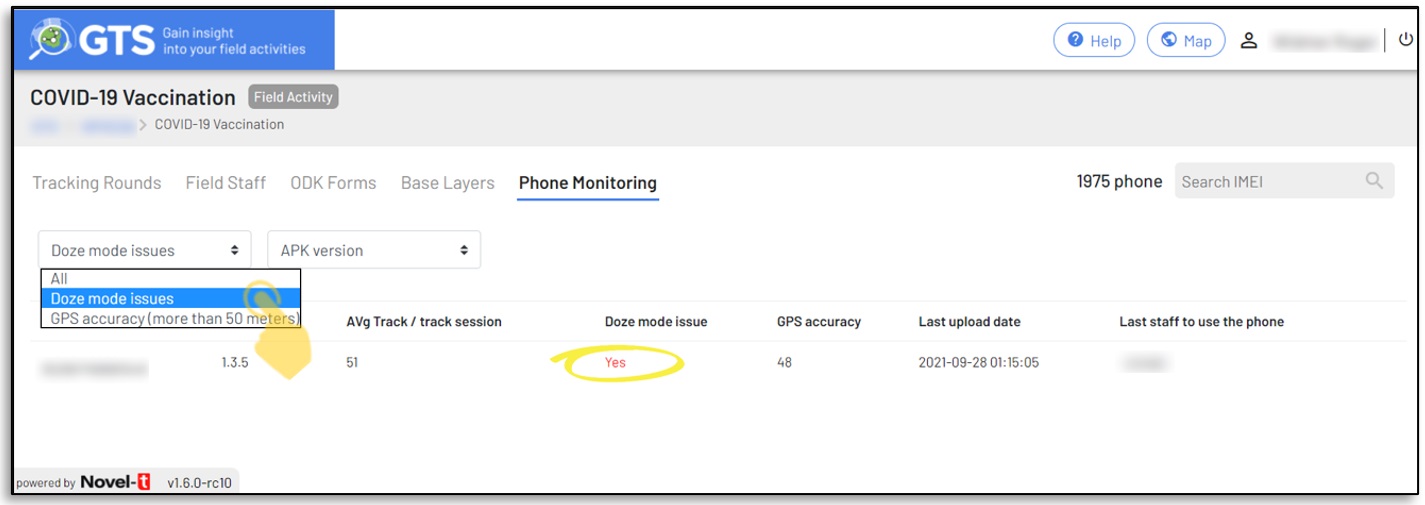
Doze Mode Issues
Doze mode is an Android operating system feature that is designed to prolong battery life by putting applications into a suspended state when they are not actively used. The GTS mobile application must not be optimized for battery life savings as this setting may result in a pause in the collection of tracks. Select “Doze mode issues” from the dropdown to filter on phones that should have their settings corrected
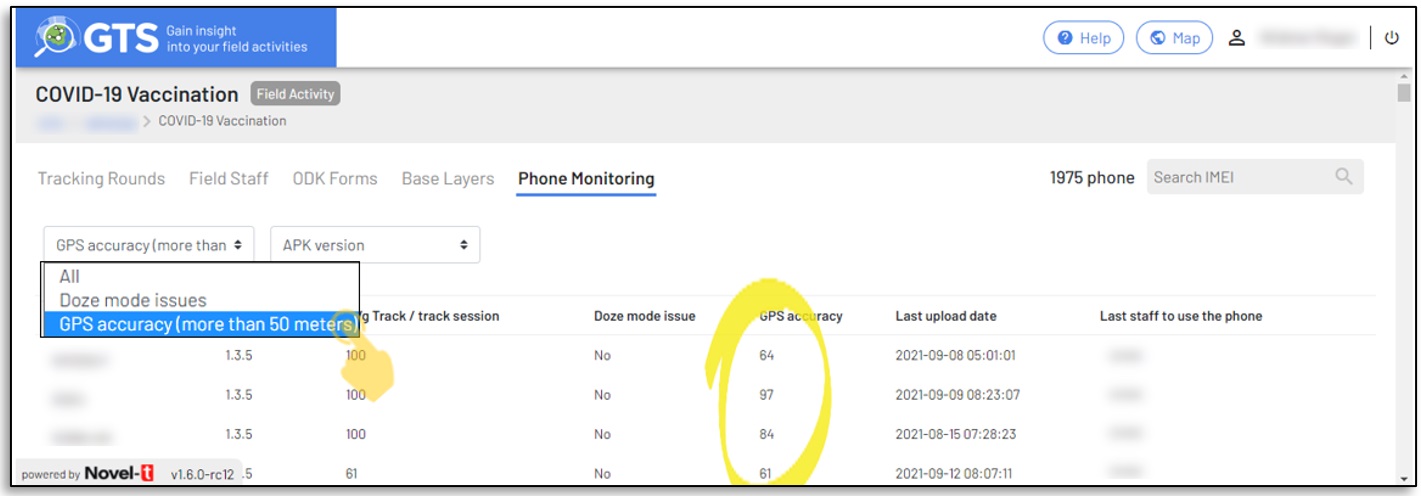
GPS Accuracy
The GPS accuracy of a mobile phone will influence where tracks are displayed on the map in the GTS Dashboard. Select “GPS accuracy (more than 50 meters)” from the dropdown to filter on phones that have poor GPS accuracy values.
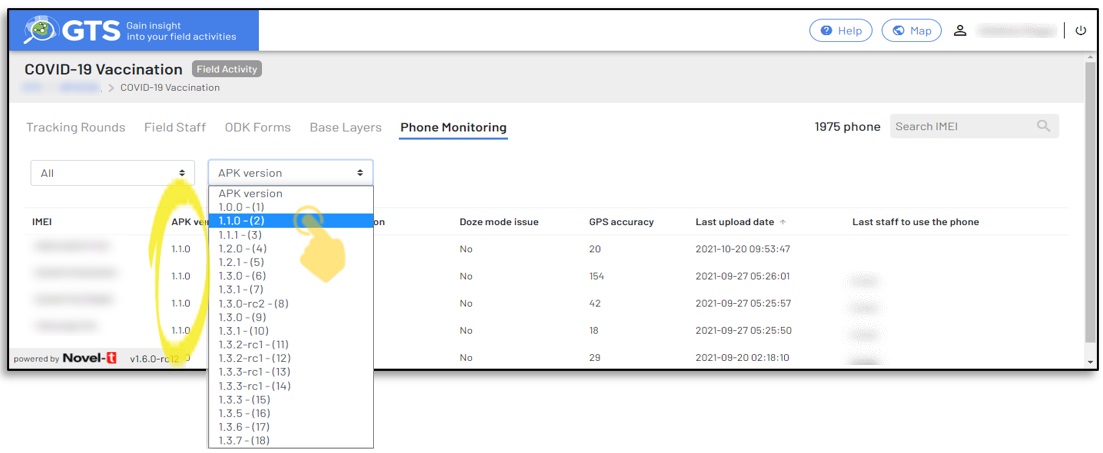
APK Version
When a new version of the mobile application is made available, users are requested but not obliged to update their phones. Depending on the functionality released in mobile application versions, using an older version of the mobile application may have a negative effect on the data collected. Select the mobile application version to see which version a phone was using when it last uploaded data, the phone ID (IMEI) and last staff member logged in are indicated so that a follow-up can be performed and the phone updated.
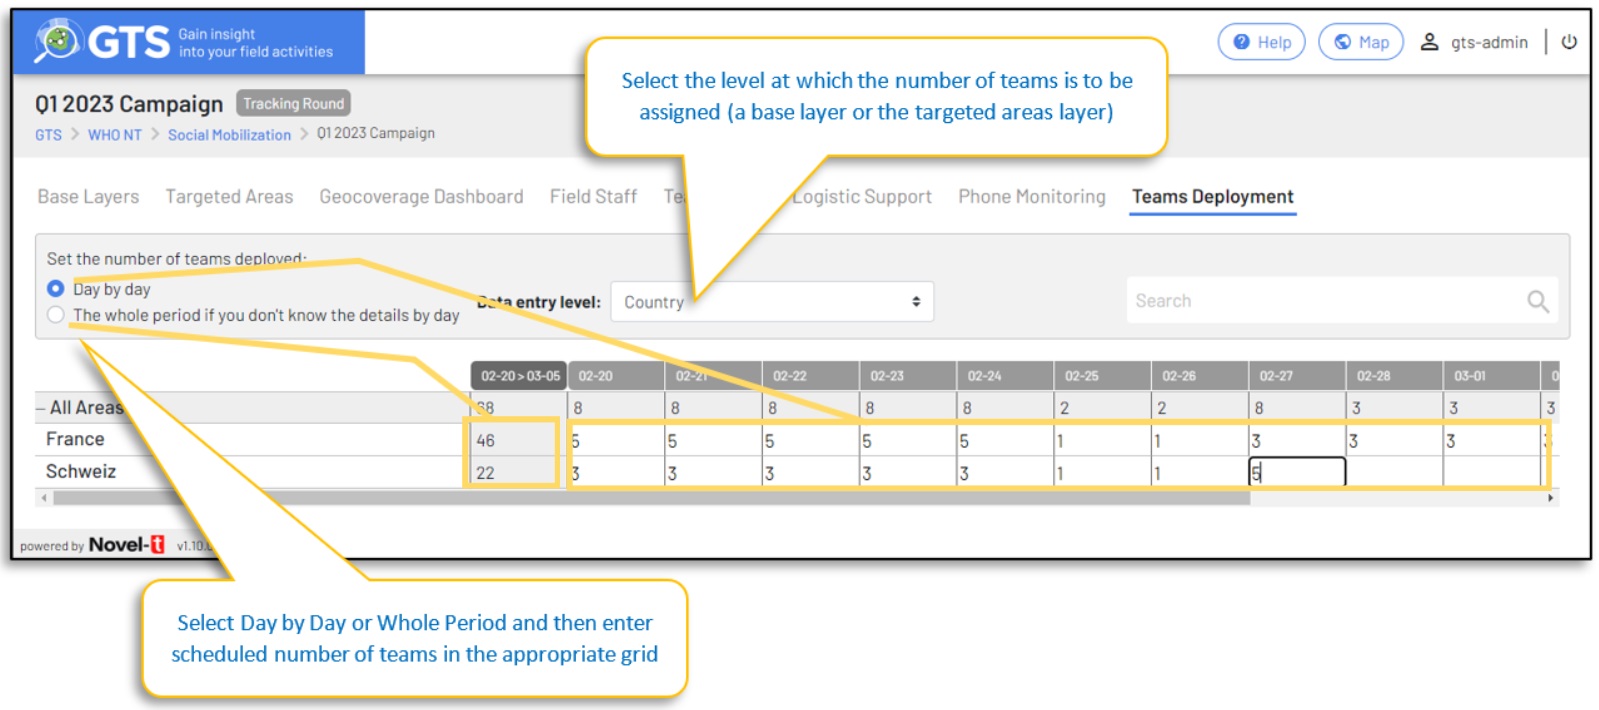
8. Teams Deployment Tab
The GTS can accommodate analysis of the number of field staff teams planned vs the number of field staff that actually performed a field activity in a particular region at a particular time.
Regions may comprise any base layer or the targeted areas layer
Timing may be the whole campaign or individual campaign days
The team Reporting analysis can be viewed by clicking on the graph icon in the map insert of the Geographic Coverage display.